Cleaning your gas oven is an essential part of kitchen maintenance. Not only does it help to maintain a hygienic cooking environment, but it also ensures your oven functions efficiently. In this comprehensive guide, we will take you through the steps to clean a gas oven thoroughly and efficiently.
Understanding the Importance of Cleaning Your Gas Oven
When it comes to maintaining your kitchen appliances, regular oven cleaning is a task that should not be overlooked. A clean gas oven offers more than just a pleasant appearance; it plays a pivotal role in ensuring safety and functionality. Here’s why keeping your gas oven clean is crucial:
1. Safety First: Safety is a paramount concern when it comes to your kitchen appliances, and the gas oven is no exception. A dirty oven can become a fire hazard, especially if there are food spills, grease, or residue inside. These elements can ignite during cooking, leading to an unexpected and potentially dangerous situation.
2. Improved Efficiency: A clean oven operates more efficiently. When the interior of your oven is covered in grease and grime, it acts as an insulator, preventing even heat distribution. This can result in unevenly cooked dishes, longer cooking times, and a waste of energy. Cleaning your oven helps it function at its best, ensuring that your recipes turn out just the way they should.
3. Better-Tasting Food: Food prepared in a clean oven not only cooks more evenly but also tastes better. A dirty oven can release unpleasant odors and flavors into your dishes, affecting the overall taste and aroma of your meals. Regular cleaning ensures that your culinary creations are as delicious as they’re meant to be.
4. Prolonged Appliance Lifespan: Your gas oven is a significant investment, and you’ll want it to last as long as possible. Routine cleaning and maintenance can extend the lifespan of your appliance. A well-maintained oven is less likely to experience breakdowns and costly repairs, ultimately saving you money in the long run.
Benefits of Regular Oven Cleaning
Now that you understand the importance of keeping your gas oven clean, let’s delve into the numerous benefits that regular oven cleaning can offer:
1. Enhanced Safety: A clean oven significantly reduces the risk of accidental fires, providing a safer cooking environment for you and your family.
2. Improved Efficiency: An oven free of grease and residue operates efficiently, saving energy and reducing your utility bills.
3. Consistent Cooking Results: Regular cleaning ensures that your oven distributes heat evenly, resulting in consistently cooked and delicious meals.
4. Better Food Flavor: Clean ovens eliminate unpleasant odors and tastes that can affect your dishes, allowing you to enjoy the true flavors of your culinary creations.
5. Extended Appliance Lifespan: By preventing buildup and damage, regular cleaning can prolong the life of your gas oven, saving you money on repairs and replacements.
6. Reduced Maintenance Costs: A well-maintained oven is less likely to require costly repairs, keeping your kitchen budget in check.
Step-by-Step Instructions for Cleaning the Interior
Safety Precautions Before Cleaning
Cleaning your gas oven is a routine task, but it’s essential to prioritize safety to prevent accidents and ensure a smooth cleaning process. Here are some crucial safety precautions to take before you start cleaning:
1. Ventilation: Ensure your kitchen is well-ventilated during the cleaning process. Open windows and doors, or use an exhaust fan to help dissipate any fumes or odors that may arise from the cleaning products.
2. Gas Supply: If you have a gas oven, it’s crucial to turn off the gas supply before cleaning. Locate the gas shutoff valve and ensure it is in the “off” position. This step is crucial for your safety, as it prevents accidental gas leaks during the cleaning process.
3. Electrical Safety: If your gas oven has electronic controls, unplug it or switch off the circuit breaker to prevent any electrical hazards while cleaning.
4. Protective Gear: For your safety and comfort, consider wearing protective gear such as gloves and safety goggles. Cleaning products and oven debris can be abrasive or irritate the skin and eyes.
5. Pets and Children: Keep pets and children away from the cleaning area. Cleaning products and hot surfaces can be hazardous, so it’s best to create a safe zone while you work.
6. Read Labels: Familiarize yourself with the cleaning product labels and instructions. Different cleaning products may have specific safety recommendations that you should follow.
Ventilation and Protective Gear
Ventilation: Adequate ventilation is essential during the cleaning process. Gas ovens can accumulate grease and grime over time, which may release fumes and odors when heated. By ensuring good airflow in your kitchen, you minimize exposure to these odors and maintain a healthier environment. Open windows and doors or use an exhaust fan to improve ventilation.
Protective Gear: Wearing protective gear is a simple yet effective way to enhance your safety and comfort while cleaning your gas oven. Here are some items to consider:
- Gloves: Heat-resistant gloves protect your hands from hot oven surfaces and abrasive cleaning products.
- Safety Goggles: Safety goggles shield your eyes from splashes of cleaning solution and potential debris dislodged during cleaning.
- Apron or Protective Clothing: Wearing an apron or old clothing can keep your regular attire clean and free from stains or chemical splashes.
Taking these safety precautions helps ensure a safer and more comfortable oven cleaning experience. By protecting yourself and maintaining good ventilation, you reduce the risk of accidents and potential health hazards during the cleaning process.
Gathering Your Supplies
Before you begin cleaning your gas oven, it’s essential to gather the necessary cleaning supplies and materials. Having everything on hand will make the process more efficient and save you from interruptions while searching for items. Here’s a list of essential supplies:
- Oven Cleaner: Choose a high-quality oven cleaner that effectively removes grease, grime, and baked-on residue. You can find a variety of commercial oven cleaners at your local store.
- Baking Soda: Baking soda is a natural and effective abrasive cleaner that helps with stubborn stains and baked-on debris.
- Vinegar: White vinegar is a versatile cleaning agent that can help dissolve grease and cut through stubborn residues. It’s particularly useful for natural cleaning solutions.
- Water: You’ll need water for mixing solutions and rinsing surfaces.
- Spray Bottle: A spray bottle is handy for applying cleaning solutions.
- Scrubbing Pads or Sponges: Choose non-abrasive scrubbing pads or sponges to avoid damaging your oven’s surfaces.
- Plastic or Wooden Scraper: Use a plastic or wooden scraper to gently remove large debris or sticky residues without scratching surfaces.
- Trash Bags: Have trash bags on hand to dispose of dirty cleaning materials and oven debris.
- Rubber Gloves: Heat-resistant rubber gloves protect your hands from hot oven surfaces and chemicals.
- Safety Goggles: Safety goggles shield your eyes from splashes of cleaning solution and potential debris dislodged during cleaning.
By having these supplies ready, you’ll be well-prepared to tackle oven cleaning effectively and efficiently. Each item serves a specific purpose in the cleaning process, ensuring that your gas oven is spotless and safe to use.
Preparing Your Gas Oven
Before you dive into the cleaning process, it’s crucial to prepare your gas oven properly. These essential steps ensure your safety and help make the cleaning task more straightforward. Here’s how to prepare your gas oven for cleaning:
- Turn Off Gas Supply: If you have a gas oven, locate the gas shutoff valve and ensure it is in the “off” position. This step is essential for preventing accidental gas leaks during cleaning.
- Unplug or Disconnect: If your gas oven has electronic controls or lights, unplug it or switch off the circuit breaker to prevent any electrical hazards during cleaning.
- Cool Down: Wait until your oven has cooled down completely before cleaning. Cleaning a hot oven can lead to burns and injuries.
- Remove Oven Racks: Take out the oven racks and set them aside for separate cleaning. You can clean the racks with oven cleaner or in a bathtub if they don’t fit in your sink.
- Clear Debris: Remove any loose debris or food particles from the oven interior. Use a plastic or wooden scraper to gently dislodge any stubborn residues.
Follow these detailed, step-by-step instructions to clean the interior of your gas oven, including racks and trays:
1. Prepare the Oven: Ensure your gas oven is disconnected from the gas supply, has cooled down completely, and the racks and trays are removed.
2. Remove Loose Debris: Using a plastic or wooden scraper, remove any loose debris, ashes, or food particles from the oven’s interior. This will make the cleaning process more effective.
3. Mix a Cleaning Solution: Create a cleaning solution by mixing water and a commercial oven cleaner or a mixture of baking soda and water. You can also use white vinegar for a natural cleaning solution. Follow the product’s instructions for proportions.
4. Apply the Solution: Carefully apply the cleaning solution to the oven’s interior surfaces. Focus on areas with heavy grease and grime buildup. Make sure the solution covers the entire surface evenly.
5. Let it Sit: Allow the cleaning solution to sit for the recommended time. This will help soften and loosen the baked-on residues, making them easier to remove.
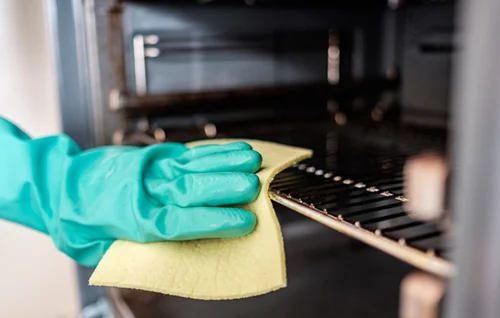
6. Scrub Gently: Using a non-abrasive scrubbing pad or sponge, gently scrub the interior of the oven. Pay extra attention to stubborn stains and buildup. You may need to apply a bit more elbow grease for persistent stains.
7. Clean the Racks and Trays: While the cleaning solution is working on the oven’s interior, clean the racks and trays separately. Submerge them in a mixture of warm water and a dishwashing liquid. Let them soak for a while and then scrub away any residue using a scrubbing pad.
8. Rinse and Dry: Once the oven’s interior is clean and the racks and trays are scrubbed, rinse everything thoroughly with clean water. Ensure no cleaning residue remains. Let the oven, racks, and trays dry completely before reassembling.
9. Reassemble the Oven: Once everything is dry, reassemble the oven. Put the racks and trays back in their respective positions.
10. Test the Oven: Turn on the oven briefly to allow any remaining cleaning residue to burn off. This will help prevent any unpleasant odors when cooking in the future.
Dealing with Stubborn Stains and Buildup
In some cases, you may encounter stubborn stains and buildup in your gas oven. Here’s how to tackle them effectively:
1. Baking Soda Paste: Make a paste of baking soda and water. Apply this paste to the stubborn stains and let it sit for an hour or more. Then, scrub with a non-abrasive pad or sponge to remove the residue.
2. Razor Blade Scraper: For extremely stubborn, baked-on stains, you can use a razor blade scraper. Gently scrape off the residue, taking care not to scratch the oven’s surfaces.
3. Repeated Cleaning: If stains persist after the first cleaning, you may need to repeat the cleaning process to fully eliminate them.
By following these instructions, you can ensure a clean and spotless interior for your gas oven.
Cleaning Oven Racks and Trays
Your oven’s racks and trays can accumulate grease, grime, and burnt food particles over time. Cleaning them is essential for maintaining a hygienic cooking environment. Here’s how to clean oven racks and trays:
1. Soak in Warm Soapy Water: Start by removing the racks and trays from the oven. Place them in a bathtub or a large container and fill it with warm water and a dishwashing liquid. Allow them to soak for several hours or overnight.
2. Scrubbing: After soaking, scrub the racks and trays with a scrubbing pad or a non-abrasive sponge. Pay special attention to areas with heavy buildup.
3. Rinse Thoroughly: Rinse the racks and trays under running water to remove all cleaning residue and soap. Ensure they are completely clean and free from any residue.
4. Dry and Reassemble: Let the cleaned racks and trays dry completely. Once they are dry, reassemble them back into the oven.
Regular cleaning of the racks and trays ensures that your food is cooked in a clean and healthy environment.
Tips for a Shiny and Clean Oven Exterior
Discover tips and techniques for maintaining a clean and shiny exterior for your gas oven. A clean oven exterior enhances your kitchen’s appearance and ensures it remains a focal point in your cooking area.
1. Everyday Maintenance: Wipe down the oven’s exterior with a damp cloth after each use. This simple routine can prevent grease and grime from accumulating.
2. Use a Mild Cleaner: For regular cleaning, you can use a mild cleaning solution, such as a mixture of water and dish soap. Apply it with a soft cloth, sponge, or non-abrasive scrubbing pad.
3. Avoid Abrasives: Do not use abrasive cleaners, scouring pads, or harsh chemicals on the oven’s exterior, as they can damage the finish.
4. Stainless Steel Care: If your oven has a stainless steel exterior, use stainless steel cleaner to maintain its shine. Apply the cleaner in the direction of the grain with a soft cloth.
5. Wipe Spills Promptly: When spills occur on the oven’s exterior, wipe them up as soon as possible