What could be causing the igniter to glow but no flame to follow? In this guide, we’ll explore this puzzling situation and provide troubleshooting tips to help you get to the bottom of the issue.
Understanding the Gas Oven Igniter
Gas ovens are intricate appliances that rely on a combination of components to produce heat for cooking and baking. Among these components, the gas oven igniter plays a pivotal role in the heating process. Understanding how it functions is essential when troubleshooting igniter-related issues.
1. The Igniter’s Role in the Oven’s Operation
The gas oven igniter serves as the ignition source that initiates the heating cycle. When you set your oven to a specific temperature, the igniter is activated to commence the cooking or baking process. Its primary functions include:
- Gas Release Control: The igniter regulates the flow of gas into the oven’s burner. It ensures that the gas supply remains controlled until the moment of ignition.
- Ignition Spark: As the igniter energizes, it generates a substantial amount of heat, becoming red-hot. This intense heat serves as the ignition source for the gas.
- Flame Creation: The red-hot igniter’s heat is transferred to the gas, which, when combined with oxygen, creates the necessary flame. This flame is essential for generating the heat required for cooking or baking.
2. How the Igniter Works
The igniter’s functionality hinges on a straightforward yet effective process:
- Electrical Current: When you set your oven to the desired temperature and turn it on, an electrical current is directed to the igniter.
- Heating Element: The igniter consists of a heating element, typically composed of a special ceramic material. When the electrical current passes through this element, it begins to heat up rapidly.
- Glowing Intensity: As the heating element reaches high temperatures, it undergoes a transformation, glowing red-hot. This intense heat serves as the ignition source for the gas.
- Gas Flow: Simultaneously, the oven’s gas valve is activated, releasing gas into the burner. However, this gas remains unignited until it encounters the red-hot igniter.
- Ignition: When the gas meets the red-hot igniter, it ignites instantly, creating a flame. This flame provides the necessary heat for the oven’s cooking or baking function.
- Temperature Control: The oven’s thermostat continually monitors the temperature and regulates the gas flow and igniter operation to maintain the desired temperature.
- Cycling: The igniter may cycle on and off during the cooking process, ensuring a consistent flame and temperature.
Common Signs of a Glowing Igniter and No Flame
Recognizing this issue is essential to troubleshooting. Here are common signs that your gas oven igniter is glowing, but there’s no flame:
- Glowing Igniter: The igniter lights up and appears to be working correctly.
- No Flame: Despite the igniter glowing, there is no flame in the oven.
Possible Causes
Several factors can contribute to this problem:
- Faulty Igniter: The igniter may be weak or malfunctioning, not generating enough heat to ignite the gas.
- Gas Valve Issues: Problems with the gas valve can prevent it from opening and allowing gas to flow to the burner.
- Gas Supply Issues: If there’s an issue with the gas supply, such as low gas pressure, it can result in an incomplete ignition.
- Safety System Activation: Some ovens have safety systems that shut off gas if they detect issues. These systems can be triggered by problems like gas leaks or improper airflow.
Now, let’s dive into the troubleshooting process to identify and address the problem.
Troubleshooting Steps
Safety First: Gas Oven Precautions
Before you begin troubleshooting, always prioritize safety:
- Gas Supply: Turn off the gas supply to the oven. Locate the gas shut-off valve and ensure it’s in the “off” position. This is a crucial safety step.
- Proper Ventilation: Ensure your kitchen is well-ventilated. Open windows or use exhaust fans to disperse any gas that might have accumulated.
- Gas Odor: If you detect a strong gas odor in your kitchen, evacuate the area immediately. Do not attempt any repairs if you suspect a gas leak. Contact your gas company or emergency services to address the issue.
- Disconnect Power: Unplug your oven from the electrical outlet to avoid any electrical hazards.
Step 1: Visual Inspection
Start by visually inspecting the oven’s interior and gas burner. Look for any obvious signs of damage, blockages, or loose connections.
Step 2: Checking the Igniter
- The igniter should glow bright red. If it’s dim or appears weak, it may need to be replaced.
- Conduct an igniter continuity test using a multimeter. A properly functioning igniter should have continuity. If it doesn’t, it’s likely faulty.
- Replace the igniter if it fails the continuity test.
Step 3: Testing the Gas Valve
- Verify that the gas valve is in the “on” position.
- If the gas valve is on, but there’s no gas flow to the burner, it may indicate a gas valve issue. In this case, professional repair or replacement may be necessary.
Step 4: Investigating Gas Supply Issues
- Ensure that other gas appliances in your home are functioning correctly. If they’re not, there may be a gas supply issue that requires attention from your gas provider.
- If the gas supply seems fine, check for any obstructions or kinks in the gas line leading to the oven. Clear any blockages and ensure that the line is in good condition.
By following these troubleshooting steps, you can pinpoint the issue and take the appropriate actions to resolve it.
Diagnosing Igniter Problems
Igniter Continuity Test
If your igniter is the likely culprit, perform an igniter continuity test using a multimeter:
- Disconnect the igniter wires from the oven’s control panel.
- Set your multimeter to the resistance (ohms) setting.
- Touch the multimeter’s probes to the igniter’s wires. A properly functioning igniter should have continuity, indicating a complete circuit.
- If the multimeter displays infinite resistance or no continuity, the igniter is likely faulty and should be replaced.
Replacing a Faulty Igniter
If the igniter is the problem, follow these general steps to replace it:
- Ensure the oven is unplugged, and the gas supply is turned off.
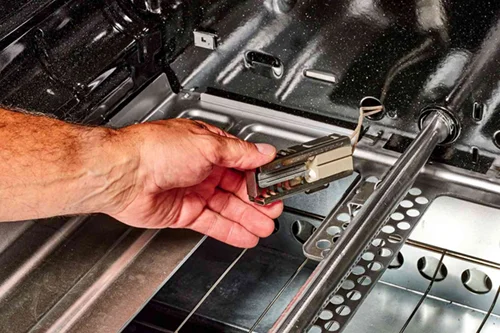
- Locate and remove the old igniter. This typically involves removing the oven’s bottom panel.
- Disconnect the wires from the old igniter and remove any mounting screws or brackets.
- Install the new igniter in the same location, securing it with screws or brackets.
- Reconnect the wires.
- Reassemble the oven and turn on the gas supply.
- Test the oven to ensure the new igniter functions properly.
Addressing Gas Valve and Gas Supply Issues
When troubleshooting your gas oven and the problem is pinpointed as being related to the gas valve or the gas supply, it’s crucial to exercise caution and prioritize safety. These components are integral to the safe and efficient operation of your gas oven. Here’s how to address potential issues:
Gas Valve Testing
- Safety First: As always, begin by ensuring your safety. Turn off the gas supply to the oven and unplug it from the electrical outlet. Adequate ventilation in your kitchen is also vital.
- Gas Valve Inspection: Locate the gas valve, usually positioned at the back of the oven. Check for any visible damage, corrosion, or loose connections. Ensure that the valve is in the “on” position. If you notice any irregularities, it’s essential to consult a professional technician or a gas appliance repair specialist. Attempting to repair or replace the gas valve without the necessary expertise can be hazardous.
- Professional Evaluation: If you suspect a gas valve issue, it’s advisable to contact a qualified technician. They have the knowledge and equipment to test the gas valve accurately and determine if it’s functioning correctly. Any necessary repairs or replacements can then be carried out safely.
Inspecting the Gas Supply Line
- Check Gas Flow: Ensure that the gas supply is not obstructed. You can perform a simple check by turning on another gas appliance in your home, such as a gas stovetop. If the other appliance fails to function correctly, it indicates a potential issue with the gas supply line. In such cases, contact your gas provider or a qualified technician to address the problem.
- Gas Line Examination: Examine the gas line leading to your oven for any visible issues. Check for kinks, bends, or blockages that might obstruct the gas flow. If you identify any problems, consult a professional to address the gas line issue. Gas lines require precise handling and expertise to ensure safety and compliance with regulations.
- Safety Precautions: While inspecting or addressing gas supply and gas line issues, always adhere to safety precautions. Turn off the gas supply and ensure adequate ventilation in your kitchen. If you detect a strong gas odor or suspect a gas leak, evacuate the area immediately and contact your gas company or emergency services. Gas-related issues require specialized attention, and it’s best not to attempt repairs without the necessary knowledge and expertise.